Elastic Search初体验
Elastic Search对比MySQL
Elastic Search和MySQL的概念对比:
| MySQL |
ES |
| Database |
Index |
| Table |
Type |
| Row |
Document |
| Column |
Field |
| Schema |
Mapping |
使用例子:
MySQL:
1
|
SELECT * FROM USER.USER_INFO WHERE NAME = '张三'
|
Elastic Search:
1
|
GET/user/user_info/_search?q=name:张三
|
安装ElasticSearch
在Elastic Search官网下载Elastic Search的对应系统的安装包,解压后,进入/bin目录,执行对应的./elasticsearch.bat或./elasticsearch.sh的脚本即可启动Elastic Search。
启动后,访问http://127.0.0.1:9200/即可看到Elastic Search的相关元信息,说明启动成功。
安装Kibana
Kibana是Elastic Search的可视化界面工具,可以方便的查看Elastic Search相关信息及数据。
在Kibana官网官网下载Elastic Search的对应系统的安装包。
解压后,进入config/目录,配置如下信息:
1
2
3
4
|
# kinaba运行使用的端口
server.port: 5601
# kibana要连接的elastic search的地址
elasticsearch.hosts: ["http://localhost:9200"]
|
Elastic Search的API示例
可以使用HTTP协议直接向Elastic Search发送对应的增删改查请求。
查看所有索引
1
|
GET 127.0.0.1:9200/_all
|
创建索引
1
|
PUT 127.0.0.1:9200/test
|
即创建名为test的索引。
删除索引
1
|
DELETE 127.0.0.1:9200/test
|
删除名为test的索引。
创建索引并新增数据
1
|
PUT 127.0.0.1:9200/person
|
1
2
3
4
5
6
7
8
|
PUT 127.0.0.1:9200/person/_doc/1
{
    "first_name" : "John",
    "last_name":"Smith",
    "age":25,
    "about":"I Love to go rock climbing",
    "interests":["sports","music"]
}
|
可以看到创建了一个名为person的索引,并向这个索引增加了id为1的用户数据。
通过id搜索数据
1
|
GET 127.0.0.1:9200/person/_doc/1
|
通过指定的字段搜索数据
1
|
GET 127.0.0.1:9200/person/_doc/_search?q=first_name:john
|
查询索引名为person中的first_name值为john的数据。
在返回JSON的hits列中可以看到已经查询出了对应的first_name为john的用户数据。
在Kibana的DEV TOOLS中也可以直接向Elastic Search发送对应的命令。例如:
查看所有索引
通过id搜索数据
1
|
GET 127.0.0.1:9200/person/_doc/1
|
通过指定的字段搜索数据
查询firsr_name字段为john的数据:
 1
 2
 3
 4
 5
 6
 7
 8
 9
10
11
12
13
14
|
GET /person/_search
{
  "query": {
    "bool": {
      "should": [
        {
          "match": {
            "first_name": "john"
          }
        }
      ]
    }
  }
}
|
同样的,可以在返回结果里的hits中看到对应的查询数据结果。
也可以指定多个字段的查询,例如查询first_name字段和about字段:
 1
 2
 3
 4
 5
 6
 7
 8
 9
10
11
12
13
14
15
16
17
18
19
|
GET /person/_search
{
  "query": {
    "bool": {
      "should": [
        {
          "match": {
            "first_name": "john"
          }
        },
         {
          "match": {
            "about": "rock"
          }
        }
      ]
    }
  }
}
|
但是,需要特别注意的是,这段请求中的should是类似于SQL中的OR的功能,就是只要满足should标签下的多个条件中的一个,就会在响应结果中返回。如果想要实现SQL中的AND功能,可以将should改为must。
可以看出,通过Dev tools比通过PostMan模拟请求的方式更加简单,只需要指定HTTP请求Method以及对应的指令即可,且Dev tools会有自动提示的功能,非常方便。
博客样例实践
接下来在项目中使用Elastic Search,例如一个博客项目中的搜索功能,首先新建对应的表:
1
2
3
4
5
6
7
8
9
|
CREATE TABLE `blog`.`t_blog`  (
  `id` int(11) NOT NULL AUTO_INCREMENT COMMENT '自增id',
  `title` varchar(60) DEFAULT NULL COMMENT '博客标题',
  `author` varchar(60) DEFAULT NULL COMMENT '博客作者',
  `content` mediumtext COMMENT '博客内容',
  `create_time` datetime DEFAULT NULL COMMENT '创建时间',
  `update_time` datetime DEFAULT NULL COMMENT '更新时间',
  PRIMARY KEY (`id`)
)ENGINE=InnoDB AUTO_INCREMENT=12;
|
ES搜索速度快的原因
对照表结构,如果不使用Elastic Search,想要实现博客内容搜索的话,需要通过类似下面这样的SQL来实现:
1
2
|
# 博客标题或内容模糊查询
SELECT * FROM T_BLOG WHERE TITLE LIKE '%springboot%' OR CONTENT LIKE '%springboot%';
|
对于SQL中的LIKE模糊查询,性能非常差,而且对于like来说,使用索引也是没有效果的,索引对于模糊匹配没有用。
Elastic Search对于内部最小的词元(term)使用的是倒排索引,所谓的倒排索引的实现原理如下图所示:
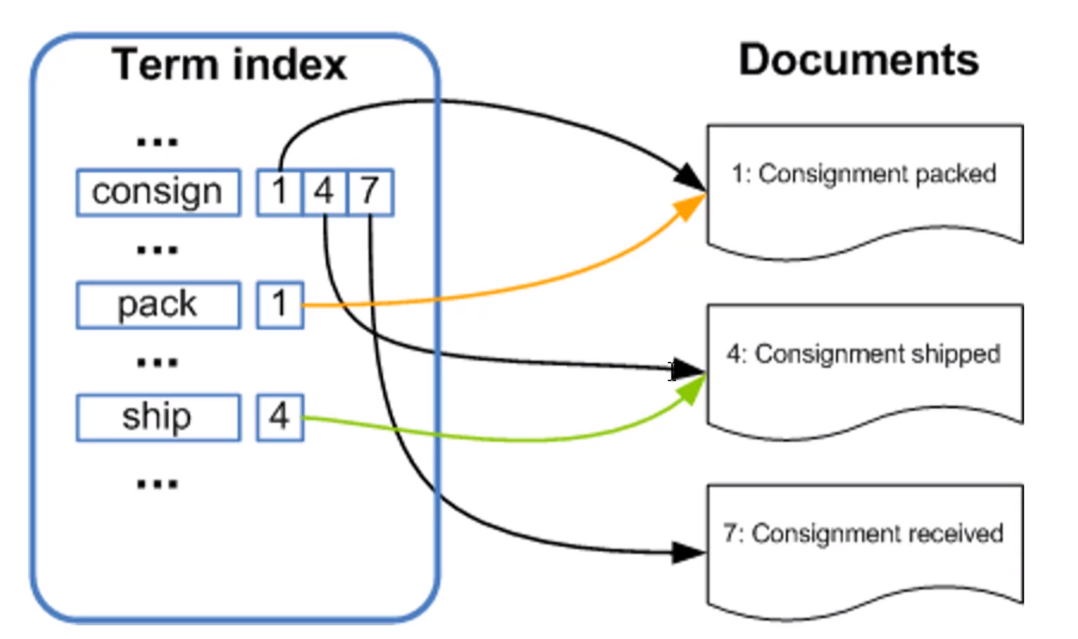
大致流程就是Elastic Search会对用户输入的数据进行分词(使用其内部分词规则或自定义的分词规则),比如对于图中的consign关键词,因为在Documents中出现在了1、4、7中,所以在左侧的分词结果中,consign这个词被和1、4、7这三篇文章关联了起来。pack、ship这两个词同理。这样一来,当例如通过名为consign的关键词进行搜索时,就会查询到id为1、4、7的三篇文章。如果还有其他查询条件的话也是同理,从而实现了非常快速的搜索功能。
ES节点概述
一个运行中的Elastic Search实例就是一个节点,Elastic Search集群就是由一个或多个节点组成的。共同承担数据负载的压力。当有节点加入集群或者被从节点中移除时,会由之前从集群中选举出的主节点重新分布编排所有的数据。主节点负责管理集群内的所有变更,比如增加/删除索引、增加/删除节点等。而且主节点并不涉及到文档级别的变更、搜索等操作。与此同时,任何节点都可被选举为主节点。同时,对外来说,可以将请求发送到集群中的任意节点(包括主节点),每个节点都知道任意文档在集群中的存储位置,并且可以将请求直接转发到存储指定文档的节点,所以无论请求被直接发送到哪个节点,最终都可以获取到对应的查询数据并返回给用户。
MySQL、ES数据同步方式
数据同步分全量、增量两种。
全量同步就是指将MySQL中已有的全部数据同步到Elastic Search中。
增量同步就是指将MySQL中随着应用的使用而产生的新增加或更新后的数据同步到Elastic Search中。
不管是全量同步还是增量同步,都可以使用各种开源中间件来实现,底层原理就是通过监听MySQL的binlog来获得对应的数据变化,然后再把获取到的这些变更的数据同步到Elastic Search中去。比如阿里开源的canal、以及Elastic Search官方推出的logstash等。在使用时,无疑还是logstash更加容易实现MySQL数据和Elastic search之间的互通。
logstash的数据源可以有多种,比如项目产生的日志文件、MySQL等,logstash像管道一样连接着数据源和Elastic Search,把相应的数据从数据源源源不断地同步到Elastic Search中。
使用logstash必须满足以下两个条件:
- MySQL表中有唯一标识一条数据的id字段
- MySQL表中有标识数据更新时间的time字段
其中,id字段用于做MySQL和Elastic Search的数据关系映射,以实现当MySQL中的数据更新时,可以准确地找到Elastic Search中对应的数据进行更新删除操作。time字段用于判断该条数据上次更新的时间,实现准确更新、提高性能的目的。
使用logstash同步数据
前往logstash官网下载对应的包并解压,在解压后的文件夹内添加对应的MySQL Connector Jar包,并在config目录下新增mysql.conf配置文件添加如下配置:
 1
 2
 3
 4
 5
 6
 7
 8
 9
10
11
12
13
14
15
16
17
18
19
20
21
22
23
24
25
26
27
28
29
30
31
32
33
34
35
36
37
38
|
input {
  jdbc {
  	# jdbc驱动包位置
	jdbc_driver_library => "C:\Users\punk1u\Desktop\logstash-7.9.2\mysql-connector-java-5.1.33.jar"
	# 要使用的驱动包类
	jdbc_driver_class => "com.mysql.jdbc.Driver"
	# mysql数据库的连接信息
	jdbc_connection_string => "jdbc:mysql://localhost:3306/blog"
	# mysql用户
	jdbc_user => "root"
	# mysql密码
	jdbc_password => "123456"
	# 定时任务,多久执行一次查询,默认一分钟
	schedule => "* * * * *"
	# 清空上次的sql_last_value记录
	clean_run => true
	# 指定数据库时区,避免出现时间和MySQL中记录的时间对不上的情况
	jdbc_default_timezone =>"Asia/Shanghai"
	# 要执行的语句
	statement => "SELECT * FROM T_BLOG WHERE UPDATE_TIME > :sql_last_value AND UPDATE_TIME < NOW() ORDER BY UPDATE_TIME DESC"
  }
}


output {
  elasticsearch {
  	# es host : port
	hosts => ["localhost:9200"]
	# 索引
    index => "blog"
	# _id,要以mysql中的哪个字段作为es文档的id
	document_id => "%{id}"


  }

}
|
配置好作为logstash入口的MySQL连接信息以及作为出口的logstash连接Elastic Search的信息。需要注意的是,为了避免MySQL中的时间和Elastic Search中数据的时间对不上,需要在MySQL配置项中添加时区配置:
1
2
|
# 指定数据库时区,避免出现时间和MySQL中记录的时间对不上的情况
jdbc_default_timezone =>"Asia/Shanghai"
|
然后切换到logstash/bin目录下,使用如下命令启动logstash:
1
|
./logstash.bat -f ../config/mysql.conf
|
启动后即可看到logstash首先执行如下SQL同步存量数据:
1
|
SELECT * FROM T_BLOG WHERE UPDATE_TIME > '1970-01-01 08:00:00' UPDATE_TIME < NOW() ORDER BY UPDATE_TIME DESC
|
然后会按照配置文件设置好的每隔一分钟重新执行一次,sql_last_value的值实时变化,便于查询出上次查询到当前时间节点的数据。
ES分词器
Elastic Search内置了很多的分词器,常见的有四种:
-
standard分词器
Elastic Search默认的分词器,把词汇单元转成小写形式,并且去除一些停用词和标点符号等。支持中文,采用方法为单字的切分。
-
simple分词器
通过非字母字符来分割文本信息,将词汇单元统一为小写形式,并会去除掉数字类型的一些字符。
-
whitespace分词器
单纯的去除空格,不会统一为小写形式,不支持中文,不会对生成词汇单元进行标准化的处理。
-
language分词器
特定语言的分词器,目前不支持中文。
以standard默认分词器为例,打开Kibana的Dev tools,输入如下内容:
1
2
3
4
5
|
POST _analyze
{
  "analyzer": "standard",
  "text": ["spring boot"]
}
|
运行后可在右侧看到分词的结果:
 1
 2
 3
 4
 5
 6
 7
 8
 9
10
11
12
13
14
15
16
17
18
|
{
  "tokens" : [
    {
      "token" : "spring",
      "start_offset" : 0,
      "end_offset" : 6,
      "type" : "<ALPHANUM>",
      "position" : 0
    },
    {
      "token" : "boot",
      "start_offset" : 7,
      "end_offset" : 11,
      "type" : "<ALPHANUM>",
      "position" : 1
    }
  ]
}
|
对于中文也可支持,输入:
1
2
3
4
5
|
POST _analyze
{
  "analyzer": "standard",
  "text": ["我是中国人"]
}
|
运行结果:
 1
 2
 3
 4
 5
 6
 7
 8
 9
10
11
12
13
14
15
16
17
18
19
20
21
22
23
24
25
26
27
28
29
30
31
32
33
34
35
36
37
38
39
|
{
  "tokens" : [
    {
      "token" : "我",
      "start_offset" : 0,
      "end_offset" : 1,
      "type" : "<IDEOGRAPHIC>",
      "position" : 0
    },
    {
      "token" : "是",
      "start_offset" : 1,
      "end_offset" : 2,
      "type" : "<IDEOGRAPHIC>",
      "position" : 1
    },
    {
      "token" : "中",
      "start_offset" : 2,
      "end_offset" : 3,
      "type" : "<IDEOGRAPHIC>",
      "position" : 2
    },
    {
      "token" : "国",
      "start_offset" : 3,
      "end_offset" : 4,
      "type" : "<IDEOGRAPHIC>",
      "position" : 3
    },
    {
      "token" : "人",
      "start_offset" : 4,
      "end_offset" : 5,
      "type" : "<IDEOGRAPHIC>",
      "position" : 4
    }
  ]
}
|
但是可以看到对于中文的分词,只是简单地分为了一个又一个汉字,并不能实现中国或中国人这样的分词,为了实现这种效果,可以使用第三方的分词器,例如效果最好的elasticsearch-analysis-ik。
使用中文分词器
前往elasticsearch-alalysis-ik的github releases页面下载和Elastic Search版本一致的elasticsearch-analysis-ik包并解压放入elastic search目录的plugins目录下。然后重启Elastic Search。
访问Kibana的Dev tools,先使用elasticsearch-analysis-ik的智能分词算法:
1
2
3
4
5
|
POST _analyze
{
  "analyzer": "ik_smart",
  "text": ["我是中国人"]
}
|
得到的结果如下:
 1
 2
 3
 4
 5
 6
 7
 8
 9
10
11
12
13
14
15
16
17
18
19
20
21
22
23
24
25
|
{
  "tokens" : [
    {
      "token" : "我",
      "start_offset" : 0,
      "end_offset" : 1,
      "type" : "CN_CHAR",
      "position" : 0
    },
    {
      "token" : "是",
      "start_offset" : 1,
      "end_offset" : 2,
      "type" : "CN_CHAR",
      "position" : 1
    },
    {
      "token" : "中国人",
      "start_offset" : 2,
      "end_offset" : 5,
      "type" : "CN_WORD",
      "position" : 2
    }
  ]
}
|
可以看到中国人三个字已经被放在了一个结果里。但是,这三个字还可以组成其他的组合,如果想展示所有的结果,可以使用ik_max_word分词器:
1
2
3
4
5
|
POST _analyze
{
  "analyzer": "ik_max_word",
  "text": ["我是中国人"]
}
|
得到的结果如下:
 1
 2
 3
 4
 5
 6
 7
 8
 9
10
11
12
13
14
15
16
17
18
19
20
21
22
23
24
25
26
27
28
29
30
31
32
33
34
35
36
37
38
39
|
{
  "tokens" : [
    {
      "token" : "我",
      "start_offset" : 0,
      "end_offset" : 1,
      "type" : "CN_CHAR",
      "position" : 0
    },
    {
      "token" : "是",
      "start_offset" : 1,
      "end_offset" : 2,
      "type" : "CN_CHAR",
      "position" : 1
    },
    {
      "token" : "中国人",
      "start_offset" : 2,
      "end_offset" : 5,
      "type" : "CN_WORD",
      "position" : 2
    },
    {
      "token" : "中国",
      "start_offset" : 2,
      "end_offset" : 4,
      "type" : "CN_WORD",
      "position" : 3
    },
    {
      "token" : "国人",
      "start_offset" : 3,
      "end_offset" : 5,
      "type" : "CN_WORD",
      "position" : 4
    }
  ]
}
|
elasticsearch-alalysis-ik之所以能达到这么好的中文分词效果,主要是因为其内置了很多词典,分词时会根据输入的内容去词典中查找有没有对应的单词,有的话就作为结果展示出来。词典位置位于其内部的config目录下(.dic结尾的文件)。
所以如果在elasticsearch-analysis-ik的词典中没有我们想要的词语,也可以自己添加进去实现我们自己想要的分词效果。
搭建Spring Boot项目
MEVAN依赖:
 1
 2
 3
 4
 5
 6
 7
 8
 9
10
11
12
13
14
15
16
17
18
19
20
21
22
23
24
25
26
27
28
29
30
31
32
33
34
35
36
37
38
39
40
41
42
43
44
45
46
47
48
49
|
<dependencies>
    <dependency>
        <groupId>org.springframework.boot</groupId>
        <artifactId>spring-boot-starter-data-jpa</artifactId>
    </dependency>
    <dependency>
        <groupId>org.springframework.boot</groupId>
        <artifactId>spring-boot-starter-web</artifactId>
    </dependency>

    <dependency>
        <groupId>org.springframework.boot</groupId>
        <artifactId>spring-boot-devtools</artifactId>
        <scope>runtime</scope>
        <optional>true</optional>
    </dependency>
    <dependency>
    <groupId>mysql</groupId>
        <artifactId>mysql-connector-java</artifactId>
        <scope>runtime</scope>
    </dependency>
    <dependency>
        <groupId>org.springframework.boot</groupId>
        <artifactId>spring-boot-configuration-processor</artifactId>
        <optional>true</optional>
    </dependency>
    <dependency>
        <groupId>org.projectlombok</groupId>
        <artifactId>lombok</artifactId>
        <optional>true</optional>
    </dependency>
    <dependency>
        <groupId>org.springframework.boot</groupId>
        <artifactId>spring-boot-starter-test</artifactId>
        <scope>test</scope>
        <exclusions>
            <exclusion>
                <groupId>org.junit.vintage</groupId>
                <artifactId>junit-vintage-engine</artifactId>
            </exclusion>
        </exclusions>
    </dependency>

    <!--引入Elastic Search依赖 -->
    <dependency>
        <groupId>org.springframework.boot</groupId>
        <artifactId>spring-boot-starter-data-elasticsearch</artifactId>
    </dependency>
</dependencies>
|
Spring Boot配置文件如下:
 1
 2
 3
 4
 5
 6
 7
 8
 9
10
11
12
13
14
15
16
17
18
19
20
21
22
23
24
|
# 通用配置源配置
spring.datasource.driverClassName=com.mysql.cj.jdbc.Driver
spring.datasource.url=jdbc:mysql://127.0.0.1:3306/blog?useUnicode=true&characterEncoding=utf8
spring.datasource.username=root
spring.datasource.password=123456

# Hikari数据源专用配置
spring.datasource.hikari.maximum-pool-size=20
spring.datasource.hikari.minimum-idle=5

# JPA相关配置
spring.jpa.database-platform=org.hibernate.dialect.MySQLDialect
#es
spring.elasticsearch.rest.uris=127.0.0.1:9200


#mvc
spring.mvc.static-path-pattern=/**

spring.devtools.livereload.enabled=true
spring.devtools.restart.additional-paths=static/**

#配置Spring MVC返回JSON数据时的日期格式化格式
spring.jackson.date-format=yyyy-MM-dd HH:mm:ss
|
Blog的实体类代码和Spring Boot对MySQL连接的代码如下:
 1
 2
 3
 4
 5
 6
 7
 8
 9
10
11
12
13
14
15
16
17
18
19
20
21
22
23
24
25
26
27
28
29
30
31
32
33
34
35
36
37
38
39
40
41
42
43
44
45
|
package tech.punklu.elasticsearchdemo.entity.mysql;

import lombok.Data;

import javax.persistence.*;
import java.util.Date;

@Data
@Table(name = "t_blog")
@Entity
public class MysqlBlog {

    /**
     * 自增id
     */
    @Id
    @GeneratedValue(strategy = GenerationType.IDENTITY)
    private Integer id;

    /**
     * 博客标题
     */
    private String title;

    /**
     * 博客作者
     */
    private String author;

    /**
     * 博客内容
     */
    @Column(columnDefinition = "mediumtext") // 指定特殊字段的类型
    private String content;

    /**
     * 博客创建时间
     */
    private Date createTime;

    /**
     * 博客更新时间
     */
    private Date updateTime;
}
|
 1
 2
 3
 4
 5
 6
 7
 8
 9
10
11
12
13
14
15
16
17
18
19
20
21
|
package tech.punklu.elasticsearchdemo.repository.mysql;

import org.springframework.data.jpa.repository.JpaRepository;
import org.springframework.data.jpa.repository.Query;
import org.springframework.data.repository.query.Param;
import tech.punklu.elasticsearchdemo.entity.mysql.MysqlBlog;

import java.util.List;

public interface MysqlBlogRepository extends JpaRepository<MysqlBlog,Integer> {

    /**
     * 按时间倒序查询所有博客
     * @return
     */
    @Query("select e from MysqlBlog e order by e.createTime desc")
    List<MysqlBlog> queryAll();

    @Query("select e from MysqlBlog e where e.title like concat('%',:keyword,'%') or e.content like concat('%',:keyword,'%')")
    List<MysqlBlog> queryBlogs(@Param("keyword")String keyword);
}
|
博客数据对应的Elastic Search对象的代码如下:
 1
 2
 3
 4
 5
 6
 7
 8
 9
10
11
12
13
14
15
16
17
18
19
20
21
22
23
24
25
26
27
28
29
30
31
32
33
34
35
36
37
38
39
40
41
42
43
44
45
46
47
48
49
50
51
52
53
54
55
56
57
|
package tech.punklu.elasticsearchdemo.entity.es;

import lombok.Data;
import org.springframework.data.annotation.Id;
import org.springframework.data.elasticsearch.annotations.DateFormat;
import org.springframework.data.elasticsearch.annotations.Document;
import org.springframework.data.elasticsearch.annotations.Field;
import org.springframework.data.elasticsearch.annotations.FieldType;

import java.util.Date;

@Data
/** Elastic Search的注解,用于指定ES中对应的索引名字和文档类型
 * useServerConfiguration:是否使用线上ES Server内的的index的mapping和配置
 * createIndex:是否在启动项目时重新在ES中创建这个索引
 */
@Document(indexName = "blog",type = "doc",useServerConfiguration = true,createIndex = false)
public class EsBlog {

    /**
     * 自增id
     */
    // 使用的是org.springframework.data.annotation包下的Id注解而不是javax下的
    @Id
    private Integer id;

    /**
     * 博客标题
     */
    // Field用于标注字段在ES中的类型及对应的分词器以及日期格式化等
    @Field(type = FieldType.Text,analyzer = "ik_max_word")
    private String title;

    /**
     * 博客作者
     */
    @Field(type = FieldType.Text,analyzer = "ik_max_word")
    private String author;

    /**
     * 博客内容
     */
    @Field(type = FieldType.Text,analyzer = "ik_max_word")
    private String content;

    /**
     * 博客创建时间
     */
    @Field(type = FieldType.Date,format = DateFormat.custom,pattern = "yyyy-MM-dd HH:mm:ss||yyyy-MM-dd||epoch_millis")
    private Date createTime;

    /**
     * 博客更新时间
     */
    @Field(type = FieldType.Date,format = DateFormat.custom,pattern = "yyyy-MM-dd HH:mm:ss||yyyy-MM-dd||epoch_millis")
    private Date updateTime;
}
|
测试Elastic Search的查询单元测试方法:
 1
 2
 3
 4
 5
 6
 7
 8
 9
10
11
12
13
14
15
16
17
18
19
20
|
@Autowired
private ElasticsearchRestTemplate elasticsearchRestTemplate;

@Test
public void test(){
    NativeSearchQueryBuilder searchQueryBuilder = new NativeSearchQueryBuilder();
    searchQueryBuilder.withQuery(QueryBuilders.matchPhraseQuery("title","测试"))
        .withQuery(QueryBuilders.matchPhraseQuery("content","测试"));
    SearchHits<EsBlog> searchResult = elasticsearchRestTemplate.search(searchQueryBuilder.build(),EsBlog.class);

    List<EsBlog> result = new ArrayList<>();
    List<SearchHit<EsBlog>> content = searchResult.getSearchHits();
    for (SearchHit<EsBlog> blog : content){
        EsBlog esBlog = blog.getContent();
        result.add(esBlog);
    }
    for (EsBlog blog : result){
        System.out.println(blog.toString());
    }
}
|
启动后,可以在控制台中看到Elastic Search中的所有博客数据,说明查询ES成功。
相应代码仓库地址:elastic-search-demo。